
Telnet is one of the most popular network protocols extensively used to manage local area network devices and some other equipment that support this protocol. It is mostly used on the Internet or LANs to provide a two-way interactive text-based communication facility using a virtual terminal connection. In short, Telnet is a text-based tool that can be used at the command prompt to connect to another computer on the Internet. Telnet is mostly used by the system or network administrators in order to connect to other systems through Internet. Telnet Client utility is very important and most useful tool that enables you to connect to other devices.

Unfortunately, the latest versions of Windows like Windows 10, Windows 8.1 and 8 do not come with installed telnet client. It may be for some security reasons that Telnet is not enabled on latest Windows version by default. Here, you can find simple steps on how to install and enable Telnet on your latest Windows 10 and Windows 8.1, 8 versions.
Usually, if you search for Telnet on your PC by typing ‘telnet’ in command prompt, it displays an error message saying: “telnet is not recognized as an internal or external command”. You need to install Telnet client on your Windows 10 and 8.1 from control panel in order to solve this issue.

You don’t need any kind of installation medium like USB, CD/DVD or hectic downloading process for this tool. You can easily enable this from control panel. Follow the simple steps shown below that guides you how to enable Telnet on Windows 10, 8.1/8.
Note: The screenshots are taken on Windows 8.1, even then it will be same for the latest version Windows 10.
Simple Steps to Enable TELNET on Windows 10, 8.1 and 8
Step 1 : Control Panel
- Initially, go to control panel.
- On Windows 10, you can access Control panel using Start button. Right click on the Start button icon and select Control Panel.

- On Windows 8.1 and 8, you can use the charm bar by moving the cursor to top right corner or simply press the Windows key + I from desktop. Now, Select Control Panel.

Step 2: Programs and Features
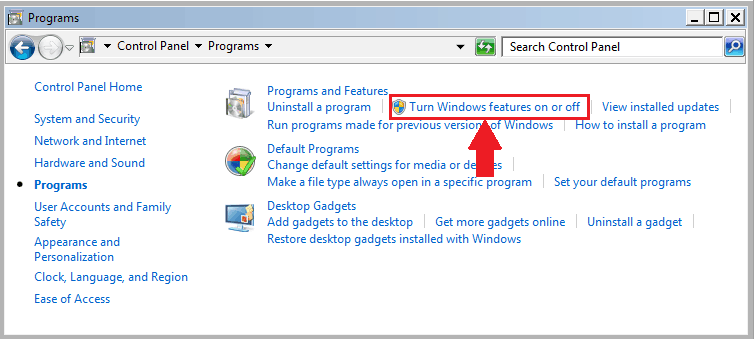
- In the Category of Control panel View, click on Programs.

- In the Programs and Features list, select “Turn Windows features on or off” as shown in the image below:
Step 3: Windows Features
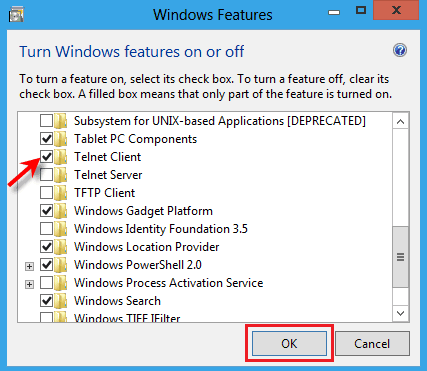
- By selecting the option as in the above image, a dialog box appears where you can select extra features to install. Select “Telnet Client” by ticking the check box.
- Click OK and it takes few minutes to install it on your system.
Now, you have successfully installed Telnet client on your PC or Laptop running with Windows 10 and 8.1, 8 Operating system.
Step 4: Check it on Command Prompt
- Now, you can access telnet from the command prompt by typing any command like “help” that displays all the abbrevations of commands that are supported on your device.

Alternate for Telnet in Windows 10/8.1/8
Telnet Client is a built-in tool which is available on Windows Operating system. Installing and enabling on your device is very simple as you have seen in the above process. Telnet Client is a good tool to manage few devices. But, the built-in tool cannot manage more number of devices and if you are a professional system or network administrator, then it is difficult for you to manage more devices. Windows Client Utility will not be suitable for those who want to manage more number of devices on Internet. Here is an alternative for Telnet Client:
PuTTY – Free Telnet Client for Windows
PuTTY is a free network file transfer application and is an alternate for telnet client which was originally developed for Microsoft Windows platform. It is an open source software which supports several network protocols. PuTTY is a great telnet client which is fully compatible with Windows 10 and 8.1/8.

Click Here: Download PuTTY
Hope this tutorial “How to Install and Enable Telnet on your Windows 10/8.1 and Windows 8” helps you to easily enable Telnet client on your device.
